

This option allows you to import data from a comma-delimited ASCII (*.CSV) file into the MusiFind Pro song database. You will be prompted after the import to automatically have albums created for the songs that have been imported.
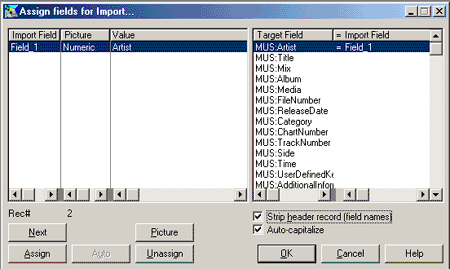
You can preview import records to determine which import fields are to be matched to the MusiFind Pro fields. You can also strip the first record, in case it contains field names.
Import Fields - This list box contains a separate entry for each field found in the import file. Beside each field is the picture. (For @S fields they will see "Alpha-num", for @N fields they will see "Numeric", and for all others they will see the actual "@..." picture.) Beside the picture is the value of the field in the current import record. If the first record in the import file contains field names, then the first values that the user sees will be these names. This can make it very handy for assigning the import fields to the target fields. They can press the [Next] button to view other records in the import file. As you move the highlight bar over Import Fields that have been assigned to Target Fields, the Target Field list box will move its highlight bar to the corresponding entry.
Target Fields - This list box shows which import fields will be assign to which target fields. As you move the highlight bar over Target Fields with assigned Import Fields, the Import Field list box will move its highlight bar to the corresponding entry.
Next button - This button causes the next record to be read from the import file and displayed in the "Import Fields" list box. If the user reaches the end of the file, then the Next button is disabled.
Picture button - This button calls the picture entry window for the currently highlighted Import Field. This picture will be used to de-format the import field. This is especially useful if the import field is a formatted date.
Assign button - This assigns the currently highlighted Import Field to the currently highlighted Target Field.
Auto button - Only available when the first import record is displayed. If the field names from the import header record happen to match your target fields, then you can automatically assign anything that matches.
Unassign button - This button clears the assignment for the currently highlighted Target Field.
"Strip header record (field names)" checkbox - This controls whether the first record of the import file is ignored. If the user presses the Auto button, then this defaults to true.
OK button - This begins the import process.
Cancel button - This cancels the import process.
NOTE: The Import Module does not support folders/directories or filenames with lengths exceeding eight characters (i.e. does not support long filenames). You will receive a file not found error if the path or file has a long filename.